Manage attacks 
Note
This procedure is for on-premises customers.
If you are a hosted customer, visit Manage attack events.
Ensure that Protect is enabled on the servers that host your applications. The Contrast header displays Attacks only when Protect is enabled.
To take action on attacks and attack events, use the following procedures.
View attacks or attack events.
Select Attacks in the header.

Select the Attacks tab or the Attack Events tab.
(Optional) Tag attacks or attack events.
Tagging attacks or attack events lets you organize them for better search results.
Select one or more attacks or attack events.
Select the tag icon (
 ) above the list.
In the Tag Attacks window, enter a name for one or more tags.
Suppress attacks or events.
Suppressing attacks removes an attack and its related events from view. To suppress an attack or an attack event, use the following procedure:
On the Attacks or Attacks Events list, select the check box for one or more rows and select the Suppress Attacks or Suppress Events icon (
 ).
).Alternatively, select the arrow at the end of a row and select the Suppress Attacks or Suppress Events option in the dropdown.
Click Suppress.
Block IP addresses
This option blocks a specified IP address. Blocking an IP address prevents unwanted activity from a specific IP address in the future.
At the end of an attack or attack events row, select the dropdown (
).
From the menu, select Denylist IP.
Enter a name for the rule that blocks the specified IP address.
Select a date when the block expires.
Click Save.
Add exclusions (attack events)
Adding application exclusions lets you exclude certain applications, or parts of them, from security analysis.
This option is available if you are using Java, .NET Framework, .NET Core, Python, Node.js, Go, or Ruby agents.
In the Attack Events list, at the end of an attack events row, select the dropdown (
).
Select Add Exclusion.
Specify a name for the exclusion.
Select the exclusion type and enter the details for that type.
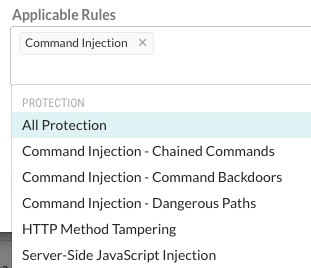
Select the rules for which the exclusion applies.
To see a list of rules, click the Applicable rules box.

(Optional) Select the checkbox to suppress all events that match the exclusion.
Click Add.
Create a virtual patch (attack events):
Virtual patches are short-term, custom defense rules that defend against specific, newly-discovered vulnerabilities in your code.
In the Attack Events grid, at the end of an attack events row, select the arrow.
Select Create Virtual Patch.
In Add Virtual Patch, enter the details for the virtual patch.
Click Save.
Specify modes for Protect rules (attack events):
Protect rules let you monitor or block specific kinds of cyber-attacks in application environments.
In the Attack Events list, select an event.
This action displays the details for the attack event.
Select the settings icon (
) next to the event name.
As needed, change the modes for each rule by selecting Change Mode or the current mode or a specific environment.

Select the appropriate modes for each environment.
Save attack data:
Contrast keeps attack event data for thirty days before removing it. You have several options for saving your data:
Output the data to syslog.
Set up a generic webhook.
A generic webhook can receive notifications on any URL that receives POST messages.
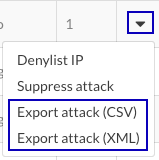
Export the data to a CSV or XML file.
At the end of an attack row, select the arrow at the end of the row and select Export attack (CSV) or Export Attack (XML).
