Integrate Contrast Security ADR with Splunk
The Contrast Security ADR integration with Splunk enables ADR to send incident details to your Security Information and Event Management (SIEM), Security Observation, Orchestration, Automation, and Response (SOAR), and Extended Detection and Response (XDR) environments, which contextualizes incidents with other threat detection and response solutions.
How it works
When configured, the Contrast Security ADR for Splunk application sends detected attack events and observations from the Contrast Security platform to a Splunk HTTP Event Collector.
The Contrast Security ADR for Splunk application on splunkbase.com enables Splunk to:
Parse and normalize the data received over the HTTP Event Collector
Display Contrast Security ADR dashboards, reports, and searches in Splunk
Provide runbooks to assist SOC Analysts in resolving application security-related incidents
Before you begin
Before you start, you must have:
Splunk Enterprise 9.2. See the
installation guide for information
Splunk CIM (Common Information Model) 5.x and later
Applications instrumented with a Contrast Security agent
Install the Contrast Security ADR application in Splunk
Install from the Marketplace
In Splunk Enterprise, select Apps and select Find more apps.
Search for Contrast Security ADR for Splunk 1.0.
Check the requirements.
Select Install.
Continue to Set up Splunk CIM.
After installation, you will see the Contrast Security ADR for Splunk applicationin the apps dropdown.
Install from a file
In Splunk Enterprise, select Apps and select Find more apps.
Search for Contrast Security ADR for Splunk 1.0.
Select download and save the file to a convenient location.
Select Manage.
Select Install app from file.
Select the application you downloaded.
Optionally, select Upgrade app if you previously installed the Contrast Security ADR application.
Select Upload.
Continue to Set up Splunk CIM.
After installation, you will see the Contrast Security ADR for Splunk application in the apps dropdown.
Set up Splunk CIM
In Splunk Enterprise, select Apps and select Find more apps.
Search for Splunk Common Information Model (CIM).
Select Install.
Enter your Splunk.com mail and password credentials.
Select the Accept and Login buttons.
Continue to Set up an HTTP Event Collector input in Splunk.
After installation, you will see the application in the apps dropdown.
Set up an HTTP Event Collector input in Splunk
Set up an HTTP Event Collector input in Splunk for attack events
In Splunk Enterprise, go to Settings > Data Input > HTTP Event Collector.
Enter a Name to help identify the token receiving data over HTTP. Remember this name.
Select the New Token button at the top of the page.
Enter the fields and select Next.
Choose Select source type and specify
contrast:adrfor the source type.Select the preferred index to store the data, like
contrast. If an index does not exist, create an index by following the steps on the relevant documentation page.Select the Review button.
Select the Submit button.
Copy the token value on the success page. This will be needed for the integration in Configure Contrast Security ADR.
Continue to Configure Contrast Security ADR.
Configure Contrast Security ADR to send events
Configure the integration in Contrast Security to send attack events to the Splunk application.
In Contrast, go to the user menu and select Organization settings > Integrations.
Select the Splunk option under the ADR Integrations section.
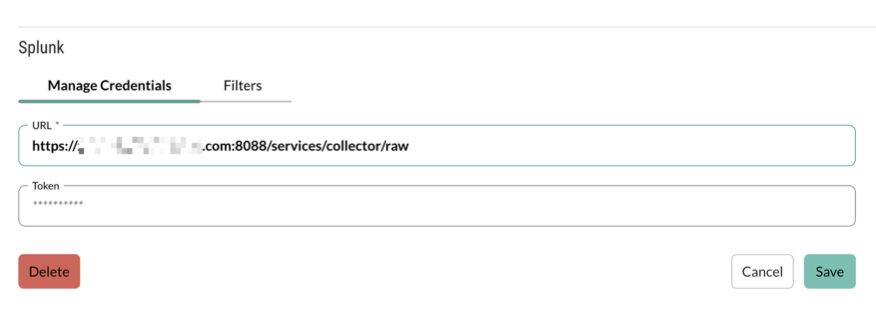
Under the Manage Credentials tab, enter the URL and token information for the destination HTTP Event Collector as configured in setting up an Event Collector for attack events. See the official Splunk Documentation for more details.

Note
Ensure your URL specifies the /services/collector/raw portion of the URL
Select Save.
Continue to Set up macros to search for events.
Set up macros to search for events
Macros are used to keep track of the index where Contrast Security ADR events are stored. The macro will be used for CIM mapping and correlation searches.
In Splunk Enterprise, go to Settings > Advanced Search.
Select Search macros.
Select Add new.
Search for the
contrast_searchmacro.Select the macro name to edit it.
Call the index name as the index provided in the HTTP Event Collector input as configured in setting up an HTTP Event Collector for attack events.
Select Save to update the macro in the index where Contrast Webhook data is stored.
To validate the macro:
In Splunk Enterprise, select Contrast Security ADR for Splunk 1.0 from the apps menu.
Select Search.
In the search box, type
contrast_search.Set the time range input to All Time.
Select Search.
You should be able to see the Contrast ADR events once the search is complete.
Continue to Set up CIM data models.
Set up CIM data models
Set up an Intrusion Detection Macro to recognize the Contrast Security ADR events.
In Splunk Enterprise, go to Settings > Advanced Search > Macros.
Select the Splunk Common Information Model (CIM) application.
Search for
cim_Intrusion_Detection_indexesand select to edit.Edit the definition as
eventtype=contrast_adr.Select Save.
Continue to View Contrast Security ADR data in Splunk.
View Contrast Security ADR data in Splunk
Splunk provides three dashboards where you can see Contrast Security data.
In Splunk, under Apps, find Contrast Security ADR for Splunk.
Select Dashboards.
Select a dashboard:
Attack Dashboard: This dashboard shows a summary of attacks that Contrast Security blocked in a specified time frame, identifies which applications are targeted for attacks, the type of attacks and when they occurred, and the most frequently targeted URIs.
Attacks by Applications: This dashboard shows the number of attacks, the different types of attacks detected and blocked, the distribution of different attack types in a specified time frame, and the top 10 most attacked URIs for the specified applications.
Attacks Geographical Distribution: This dashboard shows a geographical view of attacks that Contrast Security detected and blocked.