Configure Jira for Assess
After testing your Jira connection, you can configure Jira to create tickets based on triggers you've set.
Before you begin
Successfully connected with Jira
Steps
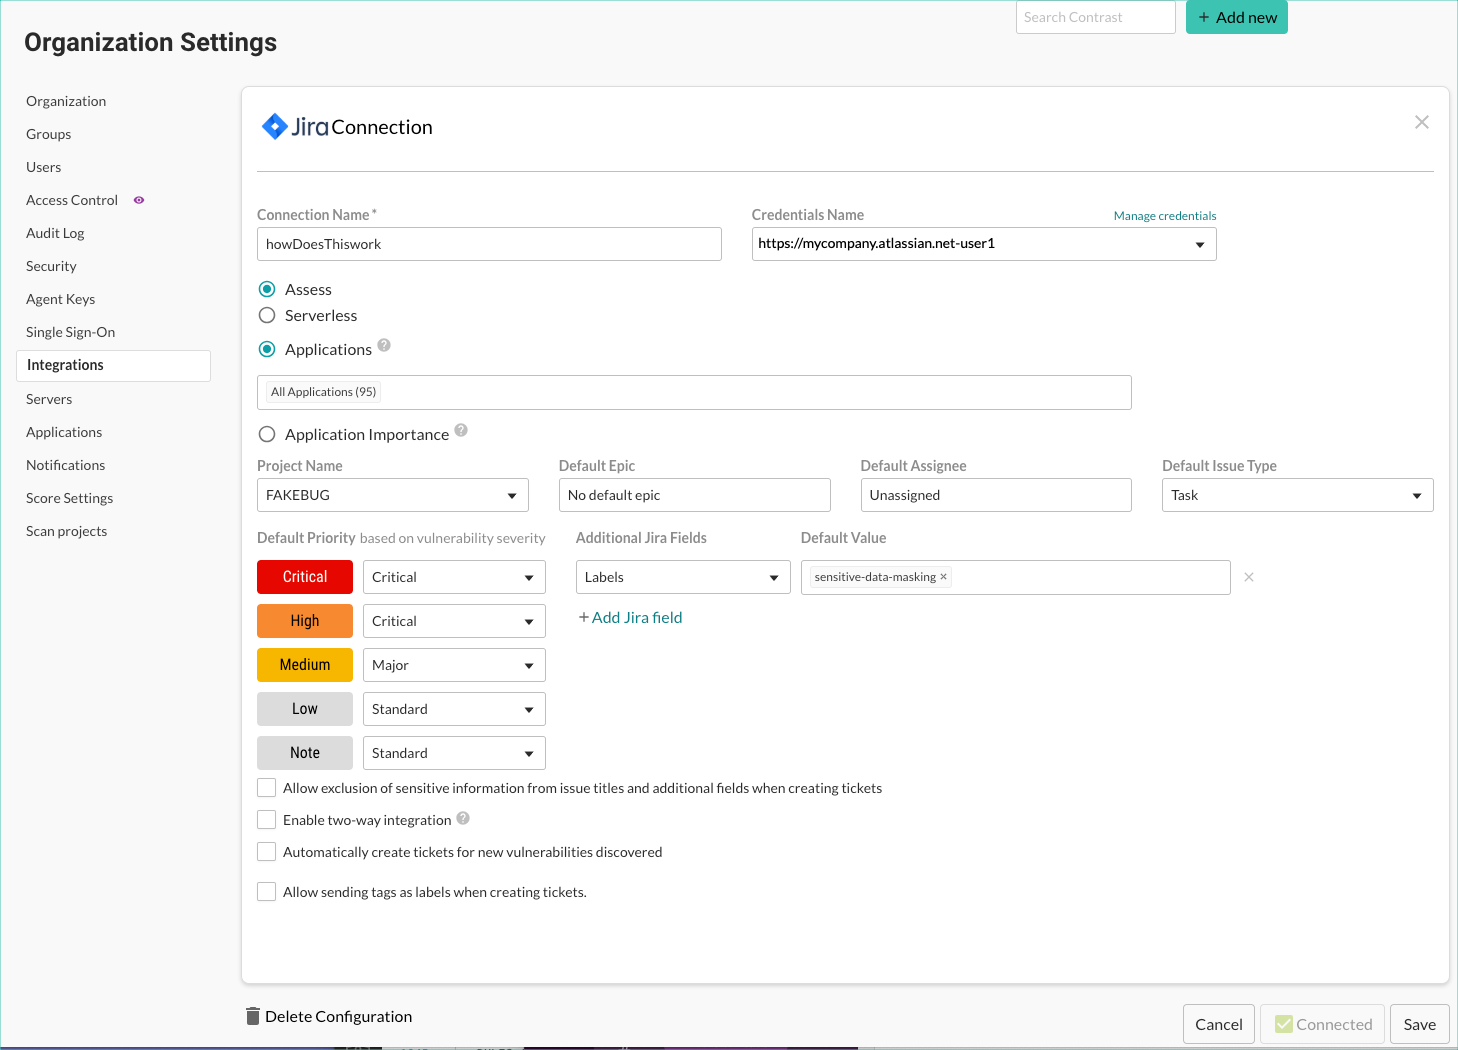
After Contrast connects to Jira, select Applications to add the Contrast applications that will trigger Jira tickets for security issues. You can also trigger Jira tickets only for applications with specific importance levels in Contrast. Select Application importance and add the application levels you want to use as a filter for Jira tickets.

Use the Project name, Default epic, Default assignee and Default issue type fields to set custom values for Jira tickets that Contrast creates. You can also map vulnerability severity levels in Contrast to Jira priority values to help teams refine security tickets. If you want to prefill additional Jira fields, select Add Jira field. Use the dropdowns to select the fields you want to add and the default value for the field.
Note
Changing the Project name or Default issue type also changes the related Jira fields and values available to you. Contrast will keep any selected values that also apply to the new project or issue type.
Select the Allow exclusion of sensitive information from issue titles and additional fields when creating tickets option to enable the ability to mask the sensitive information being sent to Jira.
Select the option to Enable two-way integration:
If you want to change the vulnerability status in Contrast, whenever an issue closes or reopens in Jira. In Contrast, use the Vulnerability status dropdowns to configure how a Jira ticket status update will change the vulnerability resolution status.
Note
If you choose Not a problem as a status, Contrast requires you to enter a Reason in the dropdown. The default selection in the dropdown is Other.
If you want to synchronize comments added to the Vulnerability Activity tab to the Jira issue and, the other way around, if a comment is added to the Jira issue it appears in the Activity tab under the Vulnerability.
If you want to show the session metadata associated with the vulnerability in the Jira ticket.
This generates a URL visible below the checkbox, which your Jira administrator must use to register and configure a webhook in Jira. Use the Comment... actions to synchronize the comments between the Activity tab and the Jira issue.
After you save the two-way integration, Contrast automatically tracks any status changes, added comments, or session metadata on related Jira tickets. You will see these as comments in the Activity tab for the vulnerability. Each comment includes the name of the Jira integration and a link to the ticket.
Note
Atlassian has deprecated the ability to register webhooks with non-https URLs. Therefore, Contrast on-premise users need to configure HTTPS before attempting to enable Jira two-way integration.
If you want a new Jira ticket made when Contrast discovers a vulnerability, select the option to Automatically create tickets for new vulnerabilities discovered. Then select which Severity levels or Rules should trigger new Jira tickets.
If Contrast creates a single Jira ticket for multiple vulnerabilities, the ticket status applies to all vulnerabilities associated with the ticket. If Contrast creates multiple tickets for a single vulnerability, all Jira tickets must close before Contrast can close the vulnerability.
Note
Automation options are not retroactive and will not generate Jira tickets for past vulnerabilities.
If you want to send tags as part of the ticket information that Contrast sends to Jira, select the option to Allow sending tags as labels when creating tickets.
When you add tags to vulnerabilities and turn on this setting, Contrast sends tags to Jira as labels.
Select Save and begin using your Jira integration. To remove the integration select Delete configuration.