Analyze scan results
A scan observes the data flow in an application and reports vulnerabilities that it discovers.
After you analyze the results, update your code and run the scan again to verify the vulnerability is fixed.
Scoring
Contrast provides a score for each scan that represents the potential security risk for an application:
Scoring is not dynamic except for vulnerabilities that have a status of Not a Problem.
Configure dynamic scoring describes how to use dynamic scoring. For all other vulnerabilities, run the scan again to see updated scores after updating code.
Scoring uses the standard scoring methodology described in the Contrast application scoring guide.
Before you begin
Contrast Scan vulnerability workflow provides guidelines for managing vulnerabilities that Contrast Scan reports.
Steps
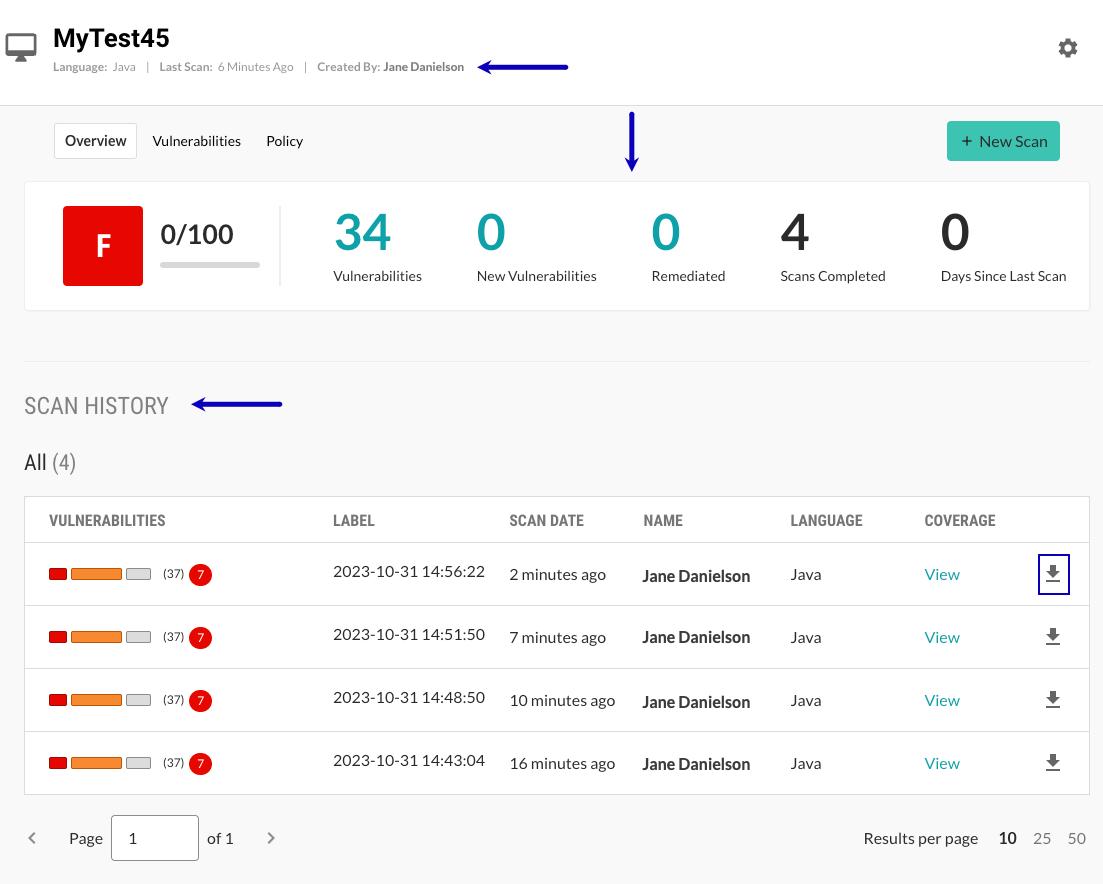
After a scan completes, you can view information on vulnerabilities, the name of the project creator, and the name of the person who ran each scan.
Select Scans in the header.
The Scans page shows a list of scan projects..
Select a scan project.
On the Overview tab, view a summary of the scan results as well as a list of scans in the project.

The summary section shows these details:
Score: A letter grade that represents the potential security risk for application based on the most recent scan in the project.
Vulnerabilities: The number of vulnerabilities discovered in the most recent scan.To see details about discovered vulnerabilities, select the number.
New Vulnerabilities: The number of new vulnerabilities discovered in the most recent scan. This value excludes vulnerabilities that previous scans discovered and are not fixed.
For example:
If Scan 1 discovered three vulnerabilities:
The number of vulnerabilities is three.
The number of new vulnerabilities is also three.
If code modifications introduce a new vulnerability but do not fix existing vulnerabilities, when you run Scan 2:
The vulnerabilities number changes to four (all discovered vulnerabilities).
The new vulnerabilities number becomes one (the new one discovered in Scan 2).
To see details about new vulnerabilities, select the number.
Remediated: The number of vulnerabilities that are fixed by changing source code or configuration files within the application.
To see details about remediated vulnerabilities, select the number.
Scans completed: The number of scans completed in the project.
To see details about completed scans, select the number.
Days since last scan: The number of days since the last scan completed.
The Scan history shows these details:
Vulnerabilities: A bar that shows the different types of detected vulnerabilities for a scan.
To view a filtered list of a specific type of vulnerability, select a section of the bar.
Label: The label associated with the scan.
To view additional scan details, select the label.
Scan date The date the scan completed.
Name: The name of the person who ran the scan.
Language: The languages detected in the scanned code.
Coverage: A link to additional scan details.
To export the results to a SARIF file, select the Download icon (
) at the end of a scan's row.
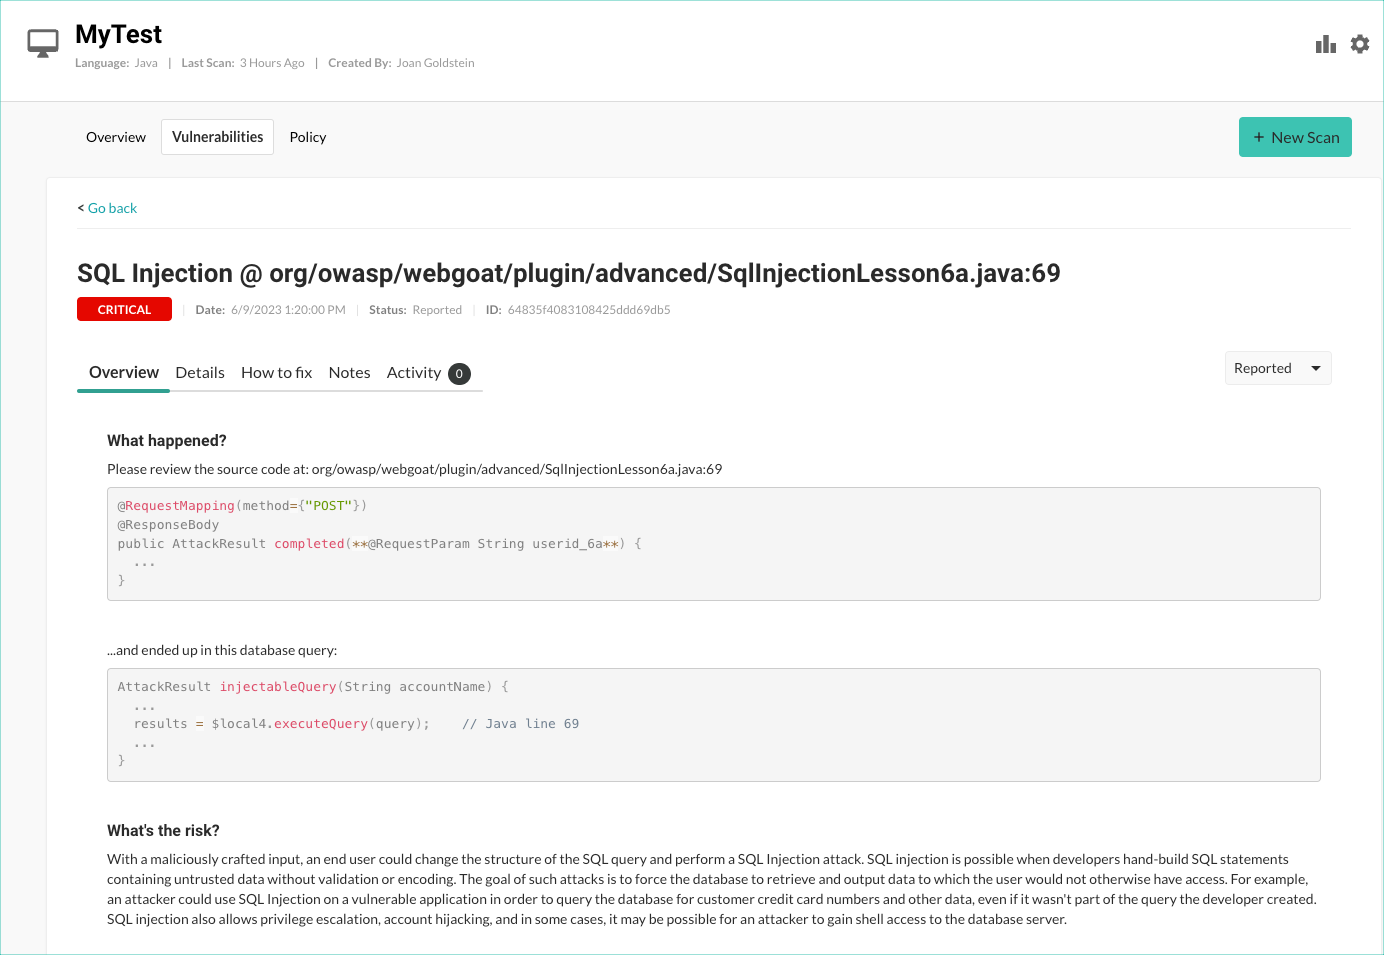
To view more information about a specific vulnerability, select the Vulnerabilities tab and select the vulnerability.

The Overview tab for the selected vulnerability shows a description of the vulnerability, including what happened in your code and the risk associated with the vulnerability.
To view the details about the vulnerability and its location in your code, select the Details tab:
The method where a vulnerability exists.
The file where the scan discovered the vulnerability.
The first line in the code where the scan discovered the vulnerability.
To view suggestions for fixing the code, select the How to fix tab.
To view suggestions for fixing the code from Secure Code Warrior, select the SCW How to fix tab.
This tab includes suggestions from Secure Code Warrior as well as videos, links to additional information, and guidelines. If no relevant Secure Code Warrior information is available, this tab is not displayed.
To view additional details about the vulnerability, select the Notes tab for these details:
When the vulnerability is detected
The code module where Contrast found the vulnerability
The type of vulnerability (for example, injection)
Severity
Risk confidence
Security standards that apply to the vulnerability
To view vulnerability activity, select the Activity tab for these details:
The user who made changes
Vulnerability status changes
Comments