Contrast walk through
Let's take a closer look at how you can use Contrast to ensure your code is secure from critical vulnerabilities and protect your applications from attacks.
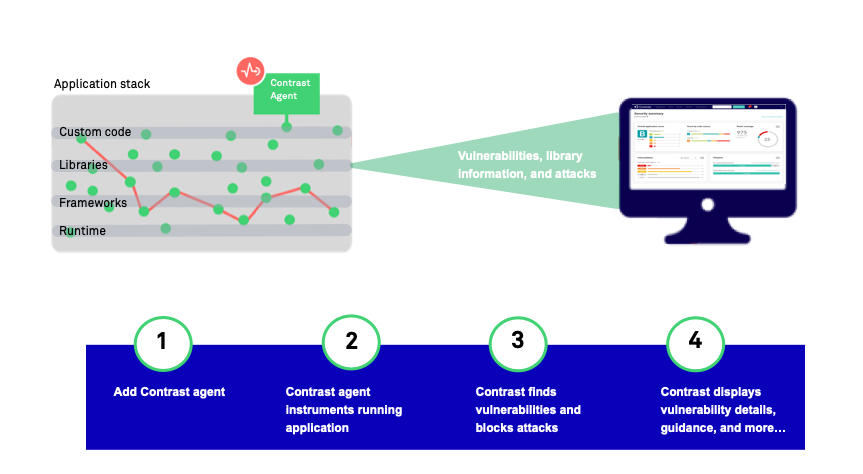
In this example, you are using the Contrast Java agent to configure applications for security testing and blocking attacks, as the application is exercised.
Customize the Contrast environment
Once you have access to the Contrast web interface, you think about customizing your environment so that you can find important test results easily and control access to Contrast data.
Access groups
You have three teams involved with your financial applications. You create these access groups and specify them in the Contrast configuration files:
Team1-Dev is for developers and has these settings:
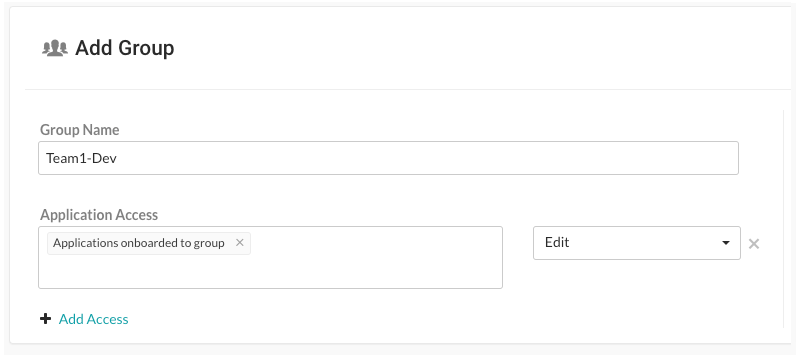
Developers can remediate findings, add tags, manage vulnerabilities, edit attributes, merge applications, add or delete applications, and create servers.
Team2-Test is for your test team and has these settings:
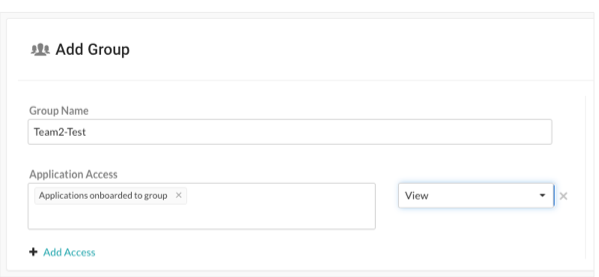
Test staff can see scores, libraries, vulnerabilities and comments, but can't perform edits to traces to the application.
Team3-AppSec is for your AppSec team and has these settings:
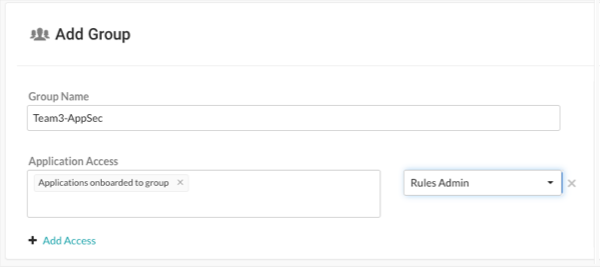
The AppSec team can edit rules and policies in the application, enable Protect, and manage notifications and scoring for the application.
Application and server naming
Since all teams are working on the same application, you use the same name in each Contrast configuration file. You plan to use one configuration file for the development environment and one for the test environment.
Although you are using two configuration files, since you use the same name for the application in both files, Contrast displays data as if you only have a single instance of the application.
You decide to let Contrast determine the server name.
Session metadata
You want to be able to view vulnerabilities and route information for a specific branch, committer, and repository. You define session metadata values in your Contrast configuration file to collect this information:
-Dcontrast.application.session_metadata="branchName=release24,committer=Jane,repository=finapp-Java”
Note
Step 1: Configure applications for security testing
During development, you want to make sure developers are checking in code that's secure. During testing, you want to verify that your applications have no vulnerabilities that will allow attacks when in production.
You decide to add Contrast to your applications so that you can do the necessary security testing before releasing your products to the public. Since your applications use Java, you are going to use the Contrast Java agent.
You download the agent from the Maven Central repository because you use Maven for your build processes. You also download a YAML configuration file from the Contrast web interface.
For your development environment, you edit the YAML configuration file to include settings similar to these:
api:
    # ********************** REQUIRED **********************
    # Set the URL for the Contrast UI.
    url:https://mycontrast.mycompany.com:8080/Contrast/
    # ********************** REQUIRED **********************
    # Set the API key needed to communicate with the Contrast UI.
    api_key:A2xxxxxxxxxxxxxxxxxxxxxxxxxxxG9N
    # ********************** REQUIRED **********************
    # Set the service key needed to communicate with the Contrast
    # UI. It is used to calculate the Authorization header.
    service_key:service_key:88xxxxxxxxxxxx5Z
    # ********************** REQUIRED **********************
    # Set the user name used to communicate with the Contrast
    # UI. It is used to calculate the Authorization header.
    user_name:agent_xxxxxxxx-xxxx-xxxx-xxxx-xxxxxxxxxxxx@mydevorg
.
.
.

# ==============================================================================
# server
# Use the properties in this section to set
# metadata for the server hosting this agent.
# ==============================================================================
# server:
  # Override the reported server environment.
  environment: development
.
.
.
For your test environment, you edit a Contrast YAML configuration file with settings similar to these:
api:
    # ********************** REQUIRED **********************
    # Set the URL for the Contrast UI.
    url:https://mycontrast.mycompany.com:8080/Contrast/
    # ********************** REQUIRED **********************
    # Set the API key needed to communicate with the Contrast UI.
    api_key:A2xxxxxxxxxxxxxxxxxxxxxxxxxxxG9N
    # ********************** REQUIRED **********************
    # Set the service key needed to communicate with the Contrast
    # UI. It is used to calculate the Authorization header.
    service_key:service_key:88xxxxxxxxxxxx5Z
    # ********************** REQUIRED **********************
    # Set the user name used to communicate with the Contrast
    # UI. It is used to calculate the Authorization header.
    user_name:agent_xxxxxxxx-xxxx-xxxx-xxxx-xxxxxxxxxxxx@mydevorg
.
.
.

# ==============================================================================
# server
# Use the properties in this section to set
# metadata for the server hosting this agent.
# ==============================================================================
# server:
  # Override the reported server environment.
  environment: QA
.
.
.
Next, you start your application and run functional tests to exercise all the routes and data endpoints that the application and business logic expose.
Using the Contrast web interface, you first check the Application page to make sure that Contrast recognizes your application. Then, you check for vulnerabilities and how to fix guidelines to determine what actions to take to secure your code.
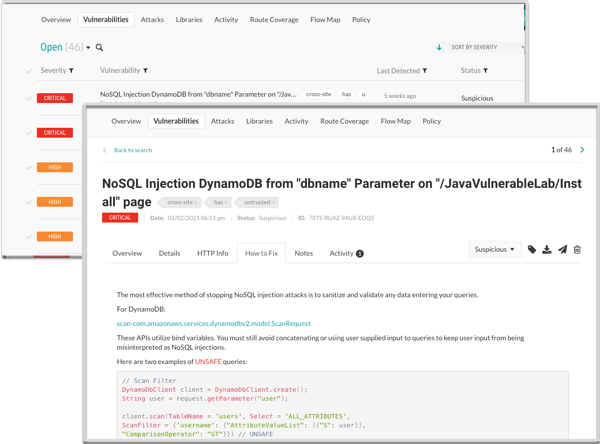
After initial tests, you decide to use the Maven plugin to integrate Contrast in to your CI/CD process. You configure the integration so that builds fail if Contrast discovers vulnerabilities with a
CriticalorHighstatus.
Step 2: Configure applications to block attacks
Although you've been using Contrast during your development and test phases, you also want make sure that your users are not subject to malicious activity when they use your product. You decide to add Contrast to the applications that are in production to protect your application, users, and data.
First, you make sure that you have a Protect license and that Protect is enabled for your organization.
Similar to how you installed and configured an agent for your application in development and test, you need to configure a new configuration file for the production environment that enables Contrast Protect. After you create the new configuration file, you run the application and verify that the Contrast web interface displays your application for a production environment.
api:
    # ********************** REQUIRED **********************
    # Set the URL for the Contrast UI.
    url:https://mycontrast.mycompany.com:8080/Contrast/
    # ********************** REQUIRED **********************
    # Set the API key needed to communicate with the Contrast UI.
    api_key:A2xxxxxxxxxxxxxxxxxxxxxxxxxxxG9N
    # ********************** REQUIRED **********************
    # Set the service key needed to communicate with the Contrast
    # UI. It is used to calculate the Authorization header.
    service_key:service_key:88xxxxxxxxxxxx5Z
    # ********************** REQUIRED **********************
    # Set the user name used to communicate with the Contrast
    # UI. It is used to calculate the Authorization header.
    user_name:agent_xxxxxxxx-xxxx-xxxx-xxxx-xxxxxxxxxxxx@myprodorg
.
.
.
# ==============================================================================
# protect
# Use the properties in this section to override Protect features.
# ==============================================================================
# protect:

  # Use the properties in this section to determine if the
  # Protect feature should be enabled. If this property is not
  # present, the decision is delegated to the Contrast UI.
  # enable: true
.
.
.
# ==============================================================================
# server
# Use the properties in this section to set
# metadata for the server hosting this agent.
# ==============================================================================
# server:
  # Override the reported server environment.
  environment: production
.
.
.
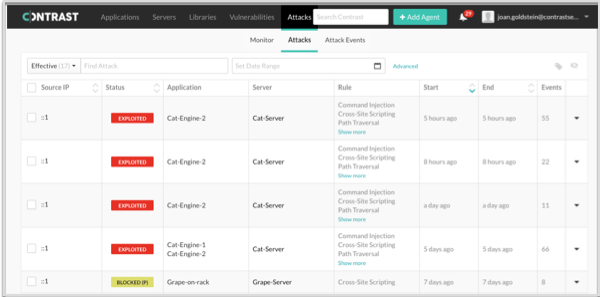
Once the application is in production, you monitor the Attacks page in the Contrast web interface to see if attacks occur.
Step 3: Fix code and retest applications
After you analyze the results of testing with Contrast and identified attacks, you update the code and ensure that Contrast displays the latest version of your application. You verify that the new version is free of the vulnerabilities you blocked in production and re-deploy the application.