Integrate Azure DevOps Pipelines with Scan local engine
The Azure DevOps Pipelines plugin enables secure, offline static application security testing (SAST) directly within Azure DevOps pipelines. It lets teams run scans locally without sending source code outside the build environment. This plugin automates the scanning process, generates SARIF-compliant results, enforces customizable security thresholds, and ensures vulnerabilities are identified early in the development lifecycle—all while maintaining full control over the source code.
Features
Enables early detection of security issues by running static scans during the development pipeline.
Seamless integration with existing Azure DevOps projects and repositories. You can add the task to both build and release pipelines.
Locally executes SAST scans on source code from the default branch, ensuring source code stays within the build environment.
Automatic scanner download from Contrast during pipeline execution.
Uploads Scan results to Contrast, allowing centralized visibility and remediation tracking.
The upload contains all the vulnerability details that are included in the scan SARIF file, such as
Information about the scanner that Contrast uses
Data on what was scanned and the scan composition
Data on vulnerability findings
Errors or notifications that are handled gracefully during the scan
Scan coverage data.
Customizable vulnerability validation: Enforces configurable validation logic with pipeline pass/fail gating based on scan results.
Supports new validation and severity validation modes:
New validation: Validates only newly introduced vulnerabilities by comparing the current scan against the baseline scan. The pipeline fails if any new issues are detected, regardless of their severity level. This method requires a previous scan to be available for comparison.
Severity validation: Lets users define a severity threshold (for example, Medium). The scan checks for all vulnerabilities that match or exceed the selected level. For example, a threshold of Medium includes Medium, High, and Critical. If the scan finds any vulnerabilities at or above the chosen level, the pipeline will fail.
Generates SARIF output and automatically uploads it as a pipeline artifact in the build pipeline.
Provides immediate visibility into detected vulnerabilities, with detailed insights available in the Contrast web interface for remediation.
Before you begin
Supported operating systems:
Windows (latest)
Ubuntu (latest)
Mac OS (latest)
Install the ADO plugin for Contrast Scan
Log in to the Azure website.
You are redirected to the Azure portal.
Select Create new organization and follow the setup instructions.
You could also select an existing organization.
Select the organization to open the Azure DevOps portal.
Install the extension (Extension - Public)
Search for Contrast and select the Contrast ADO Pipeline Integration extension and select Get it free.
Install it in your organization.
Scan local engine build pipeline workflow
In the Azure DevOps portal, clone the project into the Azure repository.
Select Repos, Files in the left panel.
Under Import a Repository, select Import.
Enter the clone URL and select import
Create a branch:
Select Branches and then, select New Branch.
Enter a new branch name that uses a format such as:
feature/scan-local-with-sastand select Create.Using
feature/puts all of your feature branches in a single folder. Grouping all the Contrast items together can be useful. For example, you could use this branch name:contrast/scan-local-with-sast.
Create a service connection for the Contrast connection service:
Go to Project Settings > Service connections > New service connection.
Select Contrast from the list of new services and then, select Next.
Enter the required information from the Contrast web interface and enable or disable logging as needed.
To find the Service key and the API key, in the Contrast web interface, under the user menu, select Organization settings > Agent keys, select a key and then, select Legacy agent keys.
If you enable logging, when the pipeline executes, the task result is captured and stored in a log file. The log file is stored as a pipeline artifact. These artifacts are stored separately from the console logs.
Create the new build pipeline:
Select the Azure Repos Git where the code is available.
Select the project created, then select Starter pipeline.
Select Show assistant in the right top corner.
Search for Contrast Local Scanner in the task list and enter all necessary details.

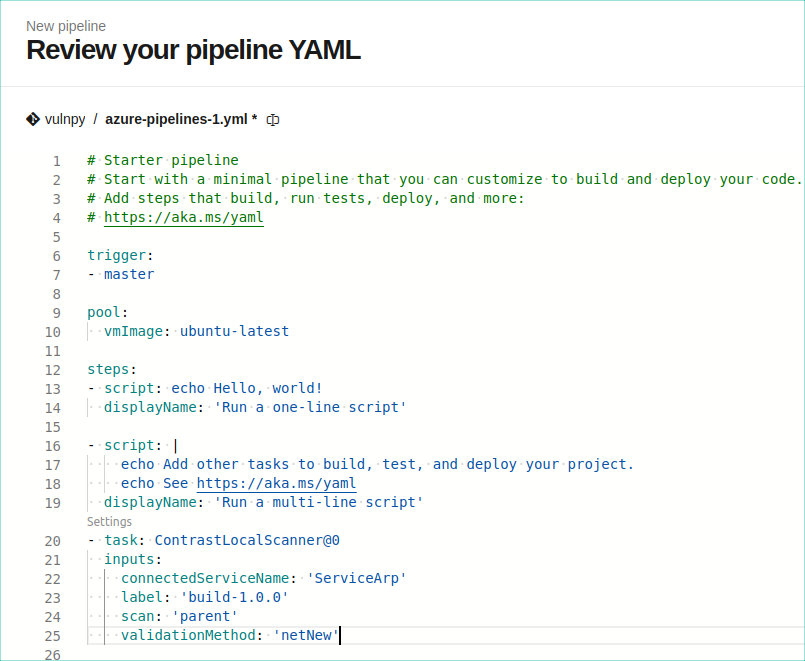
Select Add to ensure the task is properly created for a local scan. The YAML file should look similar to this example:
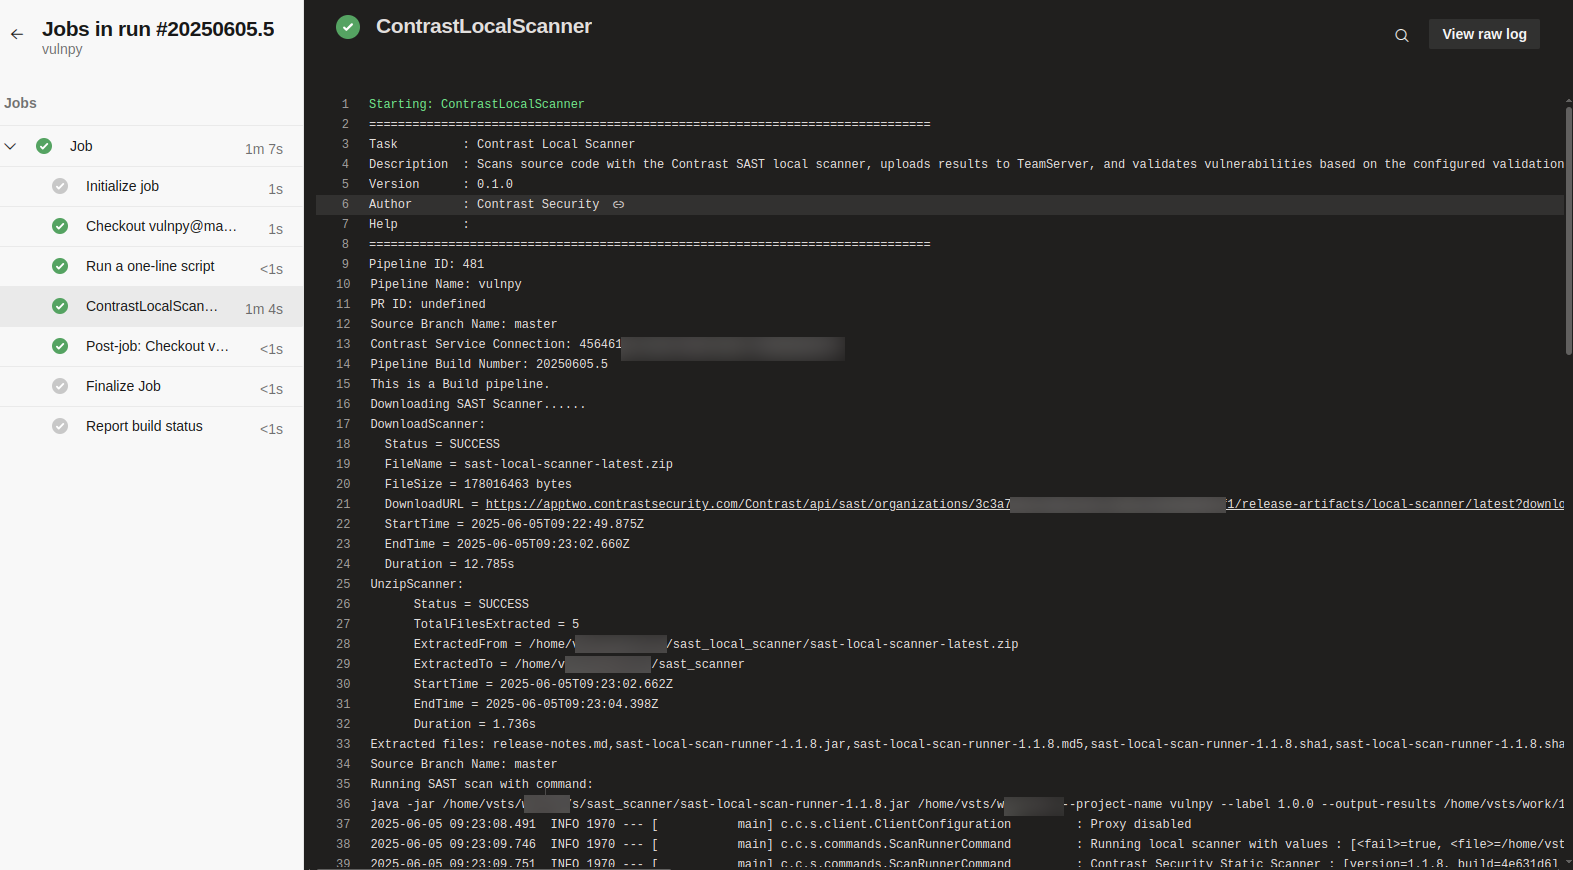
After you create the task, if there are any commits to the branch, the build is automatically triggered. After the job is successful, the console logs of the task look like this example:

The log contains these details:
Pipeline ID
Pipeline name
Pull request ID
Source branch name
Contrast service connection ID
Pipeline build number
Pipeline type (build or release)
Scanner download status
Scanner unzip status
Scanner execution status
Error messages: If the build pipeline fails, a link to the Scan overview page in the Contrast user interface is provided for the parent and development branches.
Scan local engine release pipeline workflow
In the Azure DevOps portal, select Releases in the left panel.
Select New pipeline.
Create an artifact:
Select Add an artifact and then, select the Azure Repo,
Select the project on which the pipeline should run and select the branch.
Select Add.
To trigger the pipeline based on the changes in the code, select the Lightening bolt icon (
 ) and enable Continuous deployment trigger.
Create the stages:
Select Add and then, select Empty job.
Enter the stage name and select Save.
Configure the hosted agent before adding the task:
In the selected stage, go to the Tasks tab.
Select Agent job.
Under Agent selection:
Set the Agent pool to Azure Pipelines.
Set the Agent specification to one of the following based on your requirements and select Save:
ubuntu-latestmacos-latestwindows-latest
Add the Contrast Local Scanner task to the stage:
Select the Tasks tab.
Select the Add icon (
)next to the Agent job.
In the search bar, enter Contrast Local Scanner.
From the search results, select Add to include the task in the stage.
Select the Contrast Service Connection, enter details in the required fields and select Save.
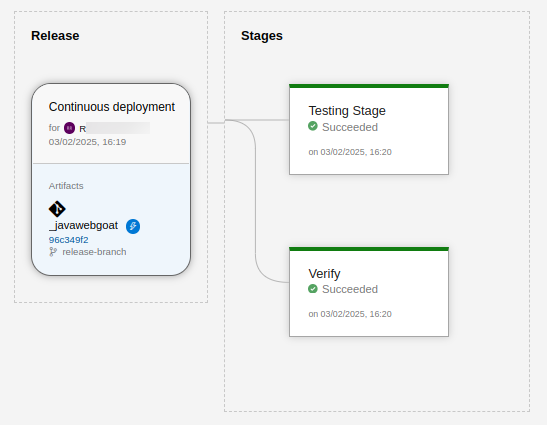
If there are any commits to the branch, the pipeline is triggered and provides the result as shown in in this example:

View logs by hovering over the stage and select the hover on the stage and select the Logs icon.
Finding ADO logs for the Scan local engine
In the DevOps portal, go to your project.
Select Pipelines > Releases.
Open the specific release for which you want to find the log files
Hover on the stage and select Logs.
Select Download all logs.
Note
You cannot download the results.sarif.json file (scan results) from the release pipeline.