Install the .NET Core agent with Azure App Service
Use this procedure for an express installation of the .NET Core agent using Azure Portal Extensions.
Before you begin
Before you begin, check the system requirements and supported technologies to be sure installation will work and ensure best performance.
Steps
Create an Azure account, if you don't have one already.
Create a .NET web application and deploy it to Azure App Service.
Publish your application to Azure, and confirm that it works as expected without Contrast.
Ensure that your application is deployed using a Windows plan. (Linux plans do not support Site Extensions.)
Note
If you do not have access to the site extension, you can install the .NET Core agent manually with NuGet.
Add the Contrast .NET Core Site Extension:
With the Azure portal
In the Azure Portal, select your hosted application.
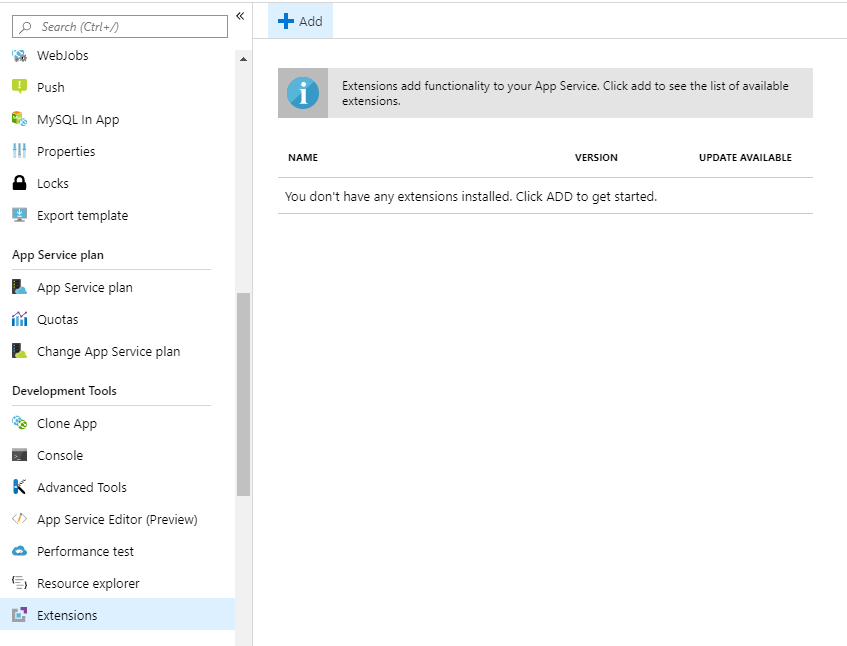
Select Extensions.

Select Add.
Select the Contrast .NET Core Site Extension for Azure App Service. This is the extension for .NET Core applications.
Select OK, and agree to the terms and conditions.
Wait a few seconds and confirm the site extension installed correctly.
Note
The site extension sets a number of environment variables, including:
CORECLR_ENABLE_PROFILING=1
CORECLR_PROFILER={8B2CE134-0948-48CA-A4B2-80DDAD9F5791}
CORECLR_PROFILER_PATH_32=D:\Home\siteextensions\Contrast.NetCore.Azure.SiteExtension\ContrastNetCoreAppService\runtimes\win-x86\native\ContrastProfiler.dll
CORECLR_PROFILER_PATH_64=D:\Home\siteextensions\Contrast.NetCore.Azure.SiteExtension\ContrastNetCoreAppService\runtimes\win-x64\native\ContrastProfiler.dll
CONTRAST_INSTALL_DIRECTORY=D:\Home\siteextensions\Contrast.NetCore.Azure.SiteExtension\ContrastNetCoreAppService\
MicrosoftInstrumentationEngine_ConfigPath32_ContrastCoreX86Config=D:\Home\siteextensions\Contrast.NetCore.Azure.SiteExtension\ContrastCieCoreClrProfiler-32.config
MicrosoftInstrumentationEngine_ConfigPath64_ContrastCoreX64Config=D:\Home\siteextensions\Contrast.NetCore.Azure.SiteExtension\ContrastCieCoreClrProfiler-64.config
If the CLR instrumentation engine (CIE) is configured for the application (for example, because Application Insights is enabled), Azure should automatically overwrite the CORECLR_PROFILER* variables to point to the profiler of the CIE.
The CIE will then use the MicrosoftInstrumentationEngine_* variables to load the Contrast agent.
If the CIE is not configured for the application, the standard CORECLR_PROFILER* variables will be used to load the Contrast agent.
With the Azure CLI
Use a command similar to this one for a .NET Core Site Extension:
az resource create --resource-group 'myResourceGroup' --resource-type Microsoft.Web/sites/siteextensions --name myAppService/siteextensions/Contrast.NetCore.Azure.SiteExtension --properties "{}"In this example, the command adds a Contrast .NET Core Site Extension to an App Service named "myAppService" in Resource Group "myResourceGroup"
After you add the extension, the Azure Portal displays a list of the installed agents with details similar to the following:
Name
Version
Update Available
Contrast.NET Core Site Extension for Azure App Service
4.2.4
No
Tip
You can also install the agent from the Site Extensions area of your application management SCM (Kudu) site.
Important
If a new version of the .NET Core agent is available, it's indicated in the Azure Portal or Kudu dashboard. You must stop the site before starting the update; otherwise, the update may fail.
Add configuration options
With the Azure Portal
In the Azure Portal, select your hosted application.
Select Configuration under Settings to configure settings that allow the agent to connect to Contrast.
Select New application setting and add the following values for your application:
Key
Value
CONTRAST__API__USER_NAME
Replace with your agent username.
CONTRAST__API__SERVICE_KEY
Replace with your agent service key.
CONTRAST__API__API_KEY
Replace with your agent API key.
CONTRAST__API__URL
Defaults to https://app.contrastsecurity.com. Replace with another URL, if you're using a Contrast application that's hosted elsewhere.
With the Azure CLI
Enter a command similar to this one:
az webapp config appsettings set --resource-group 'myResourceGroup' --name 'myAppService' --settings CONTRAST__API__URL=https://app.contrastsecurity.com CONTRAST__API__API_KEY={Your API KEY} CONTRAST__API__SERVICE_KEY={Your Service key} CONTRAST__API__USER_NAME={Your agent user}
Get API values (agent keys) from the Contrast web interface or by downloading a YAML file for the .NET Core agent.
In the Azure Portal, go to the application overview and Restart the application.
Running the application automatically instruments any application that is running inside of the App Service. You should begin to see data in Contrast
Navigate to the application and confirm the application is reporting to Contrast.
You can view log files to verify that Contrast is running:
In the Azure Portal, go to Advanced Tools for the app service.
Select Go.
In the Kudu Services window, select “Debug console” menu at the top and select “CMD”.
Select the
LogFilesdirectory.Select the Contrast directory.
Select the
dotnetdirectory.You will see an agent log named
<PID>_Profiler_<App Service Name>_<XXX>.log.Verify that there are no ERROR log entries.