Integrate with Jira
Integrate Jira with Contrast to automatically generate tickets, synchronize comments and push notifications for your applications.
Before you begin, you must have:
Jira account credentials. For Jira Cloud, this is username and API key. For on-premises Jira installations, this is username and password.
Permission to create issues in the target project.
A running Jira instance accessible via HTTP to Contrast.
A project to associate with an application that is already instrumented in Contrast.
Connect
To integrate Jira with Contrast:
In Contrast, go to the user menu > Organization settings > Integrations.
Select Connect for the Jira integration.
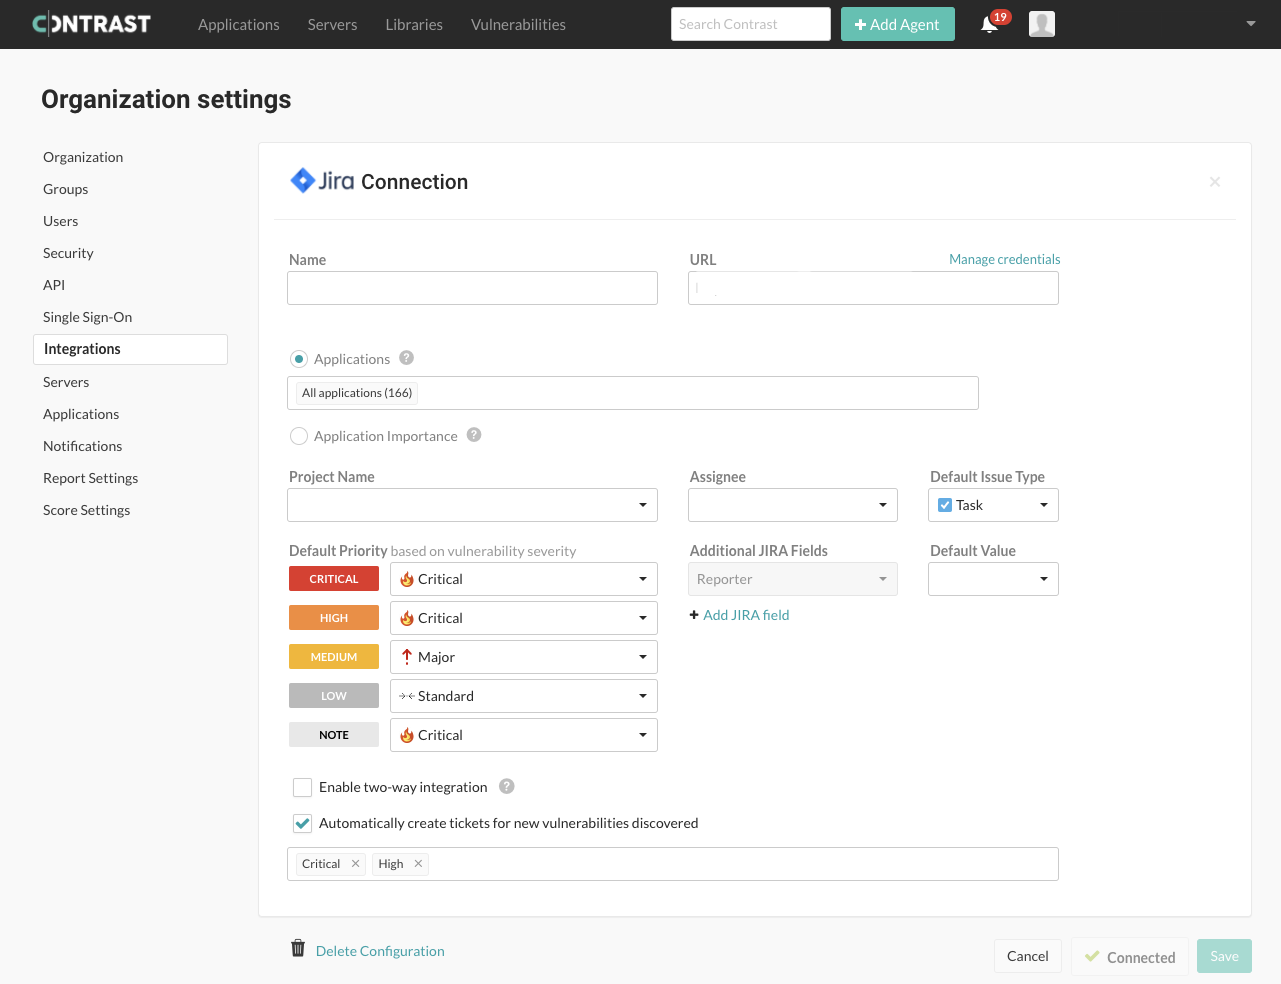
In the Connect with Jira form, add a name for the Jira integration, the username and the API key (or password for Jira that is on-premises only). Add the URL for the Jira instance, and be sure that Contrast can access the URL.
Note
Contrast saves the username, API key or password, and the URL for Jira as a set of credentials for this integration.
After you complete the form, select Test connection. The test may take a few moments, if you have many Jira projects. The test confirms that Contrast can reach the specific Jira instance and the user can log in.
After Contrast connects to Jira, select Applications to add the Contrast applications that will trigger Jira tickets for security issues. You can also trigger Jira tickets only for applications with specific importance levels in Contrast. Select Application importance and add the application levels you want to use as a filter for Jira tickets.

Use the Project name, Assignee and Default issue type fields to set custom values for Jira tickets that Contrast creates. You can also map vulnerability severity levels in Contrast to Jira priority values to help teams groom security tickets. If you want to prefill additional Jira fields, select Add Jira field. Use the drop-down menus to select the fields you want to add and the default value for the field.
Note
Changing the Project name or Default issue type also changes the related Jira fields and values available to you. Contrast will keep any selected values that also apply to the new project or issue type.
Select the option to Enable two-way integration, if you want to change vulnerability status in Contrast every time an issue closes or reopens in Jira. This generates a URL that appears below the checkbox, which your Jira administrator must use to register a webhook in Jira.
In Contrast, use the Vulnerability status drop-down menus to configure how a Jira ticket status update will also change vulnerability resolution status.
Note
If you choose Not a problem as a status, Contrast requires you to enter a Reason in the drop-down menu. The default selection in the drop-down menu is Other.
After you save the two-way integration, Contrast automatically tracks any status changes on related Jira tickets. You will see these as comments in the Activity tab for the vulnerability. Each comment includes the name of the Jira integration and a link to the ticket.
If you want a new Jira ticket made when Contrast discovers a vulnerability, select the option to Automatically create tickets for new vulnerabilities discovered. Then select which Severity levels or Rules should trigger new Jira tickets.
If Contrast creates a single Jira ticket for multiple vulnerabilities, the ticket status applies to all vulnerabilities associated with the ticket. If Contrast creates multiple tickets for a single vulnerability, all Jira tickets must close before Contrast can close the vulnerability.
Note
Automation options are not retroactive and will not generate Jira tickets for past vulnerabilities.
Select Save and begin using your Jira integration. To remove the integration select Delete configuration.
Manage Jira credentials
Contrast saves the most recent credentials for a Jira integration to help you set up new connections faster. The username, API key or password, and Jira URL values that you enter in your first configuration are the default credentials for the next Jira integration. Contrast will pre-populate the next Jira configuration with the default credentials, but you can modify these values, if you want. You can also manage saved sets of Jira credentials to update all affected configurations.
To create or edit a single configuration with credentials that are different from your default set:
Go to the user menu > Organization Settings > Integrations.
Select Show configurations to see the list of existing Jira integrations. Select the one you want to update.
Select Manage credentials to see the Jira connection configuration details.
In the URL field, use the drop-down menu to choose a set of saved credentials, or manually update the URL, username, and API key or password.
Once you've updated the fields, select Test connection to be sure the changes work.
Select Save.
Note
If you're using new credentials, you must choose to override the existing set of credentials under the given name, or save the new values as a new credential set under a different name.
To edit multiple Jira configurations at the same time:
In Contrast, go to the user menu > Organization settings > Integrations.
Select Manage credentials in the Jira Integration.
In the Manage Jira credentials form, use the drop-down menu to select a set of saved credentials.
Edit the username, API key or password, or Jira URL.
Select Rename if you want to use a different name for the edited credentials.
Note
Any updates to a set of credentials will affect all configurations using that set.
Select Test connection to be sure the integration works.
Select Save.
Note
Any updates to a set of credentials will change all configurations that use this set.