Configure Microsoft Active Directory
As a System Administrator, you can configure Contrast to connect to a Microsoft Active Directory (AD). Use the AD connector to configure this integration. AD has a well-defined structure for directories, resulting in fewer possibilities and a more direct configuration.
Note
Switching to AD from a different authentication method such as a local database may result in issues if the user ID attribute is inconsistent.
Access if AD is offline
In the event that your AD service experiences connectivity or configuration issues, use the default SuperAdmin account to log in to Contrast. This feature ensures that you continue to have immediate access to your Contrast account even when AD is offline.
Steps
Start by creating a user in the Active Directory Server that is a dedicated read-only user. The user should have read permission to the directory, including users with permission limited only to the Search Base. You will need this user to set the Search Base when configuring users for AD and when binding to user.
Create user groups in the external AD server. You will later use these groups to assign SuperAdmin privileges in Contrast.
Under system settings, select Authentication.
Select Change authentication method and follow the steps to configure server, groups and advanced settings.
Select Active Directory.
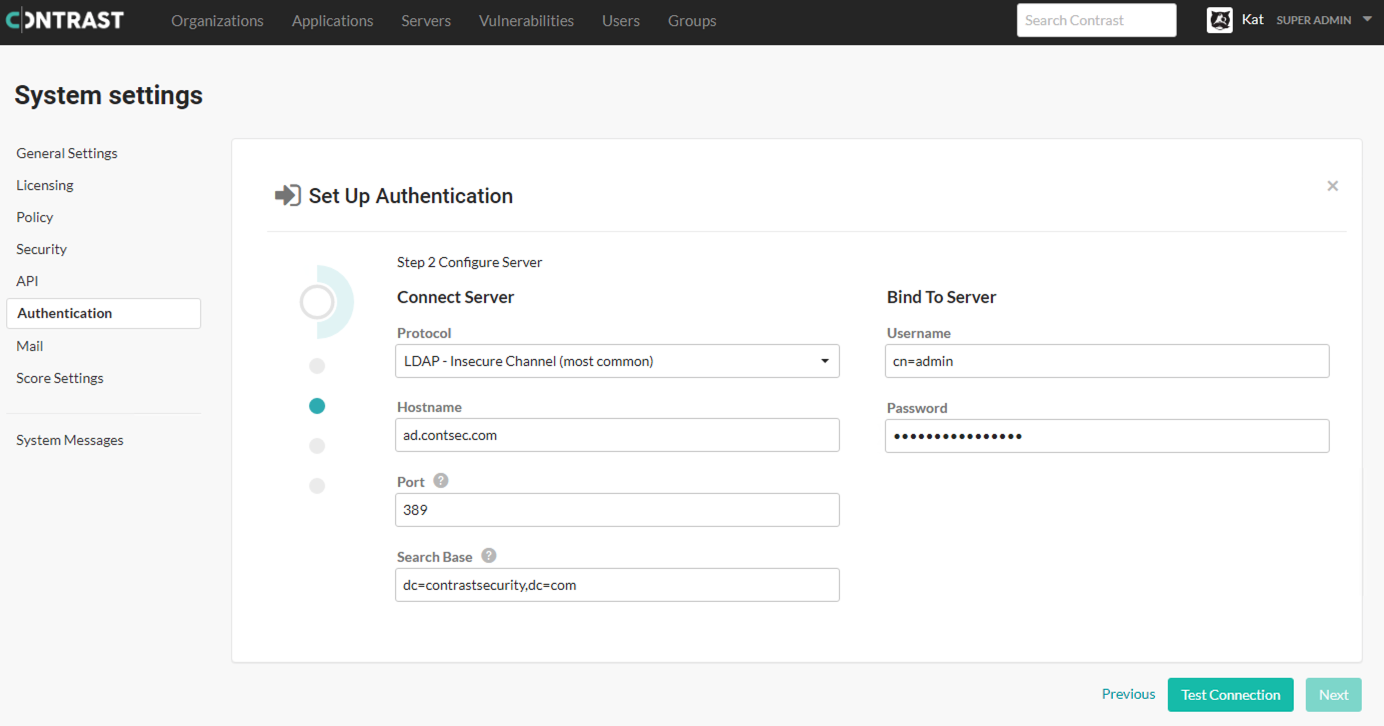
Enter the following information. Some settings may be different for LDAP over SSL (LDAPS) as noted.

Under Connect server:
Protocol: Enter the protocol that should be used to communicate with the LDAP server. Choose LDAP or LDAPS from the dropdown. The default is LDAP. Additional configuration may be needed for the LDAPS option if you are using a self-signed or privately-signed certificate with AD.
Hostname: Enter the hostname to connect to when communicating with the LDAP server; either the DNS hostname or IP address of the AD server. In multi-tenant forests, this should be the Global Catalog Server. The default is
localhost".Port: Enter the port to connect to when communicating with the LDAP server. For standard (single-tenant, single-domain) directories, this should be port 389 (LDAP) or 636 (LDAPS). In multi-tenant or multi-domain forests, this should be 3268 (LDAP) or 3269 (LDAPS).
Search base: Enter the base DN (a distinguished name that represents the global base level container for your AD environment) to use when communicating with the LDAP server. This is usually your domain or subdomain name. The default is
dc=contrastsecurity,dc=com. If your login domain is yourdomain.com, your base DN would bedc=yourdomain,dc=com.
Under Bind to server.
Username: Enter the full DN of the user who can bind to the directory to perform search functionality. The default is
cn=Directory Manager.Password: The password of the user account that the application should use when connecting to the LDAP server.
Select Test connection to ensure connectivity to the server. Once connectivity is verified, select Next.
Once all of the configuration options are set, verify that you are able to log in as both a SuperAdmin and an Organization Administrator using the Test login button.
Note
If the test seems to take an excessive amount of time, it's likely a result of having the wrong setting for the Follow referrals option in Advanced settings. Once you switch the setting, you should be able to verify login functionality more quickly.
Select Finish to complete the configuration.