Configure single sign-on (SSO) at a system level 
Single sign-on (SSO) is an authentication service that allows access to multiple applications using one set of credentials. As a System Administrator, you can configure Contrast to use this service with a SAML 2.0 supported provider.
Note
For more information, see the SAML 2.0 specification.
If you're not using SSO, protect your system by configuring multi-factor authentication as a required setting.
If you configure SSO in Contrast and also want to use multi-factor authentication, configure it using your identity provider (IdP), instead of Contrast. With SSO configured, Contrast passes the responsibility of authenticating users to the IdP.
Authentication happens through an identity provider (IDP). You may use your own generic IDP or one of many popular third-party providers, such as Okta, OneLogin, Ping Identity or ADFS.
Have your IDP metadata information ready, and then provide your metadata to connect to Contrast via an XML file or a Metadata URL.
For on-premises customers, the SuperAdmin configures SSO at the system level. Hosted customers can configure SSO at an organization level. Multi-tenant hosted instances can have multiple IDPs configured to a single instance of Contrast.
Note
If users are identified with a user ID rather than an email address, those accounts don’t automatically transfer over to the SSO configuration and must be recreated.
Before you begin
When using SSO, you must configure your NameID to pass the user's email.
Optionally, to set the user's first and last name, you must configure their IdP to pass additional attributes via the SAML assertion using:
First name: http://schemas.xmlsoap.org/ws/2005/05/identity/claims/givenname
Last name: http://schemas.xmlsoap.org/ws/2005/05/identity/claims/surname
If those fields are not present or are blank, the default is to use the NameID field. And if user provisioning is enabled, the user’s first and last name will auto-populate.
1<saml2:Attribute Name="http://schemas.xmlsoap.org/ws/2005/05/identity/claims/givenname"
2                             NameFormat="urn:oasis:names:tc:SAML:2.0:attrname-format:unspecified"
3                             >
4                <saml2:AttributeValue xmlns:xs="http://www.w3.org/2001/XMLSchema"
5                                      xmlns:xsi="http://www.w3.org/2001/XMLSchema-instance"
6                                      xsi:type="xs:string"
7                                      >Dan</saml2:AttributeValue>
8            </saml2:Attribute>
Steps
Contrast doesn't provide keys for SAML authentication. If you enable SSO without providing private keys, you're only able to perform IDP-initiated logins. You need to generate your own self-signed key using the Java Keytool:
keytool -genkeypair -alias some-alias -keypass changeit -keyalg RSA -keystore samlKeystore.jks
Use the encrypted properties editor to modify saml.properties, and update the values to the keystore you created in the previous step.
 authenticator.saml.keystore.path                  : /path/to/samlKeystore.jks
 authenticator.saml.keystore.default.key           : some-alias
 authenticator.saml.keystore.passwordMap           : some-alias=changeit
 authenticator.saml.keystore.password              : changeit
Once you make the changes, restart Contrast so that it picks up the new keystore.
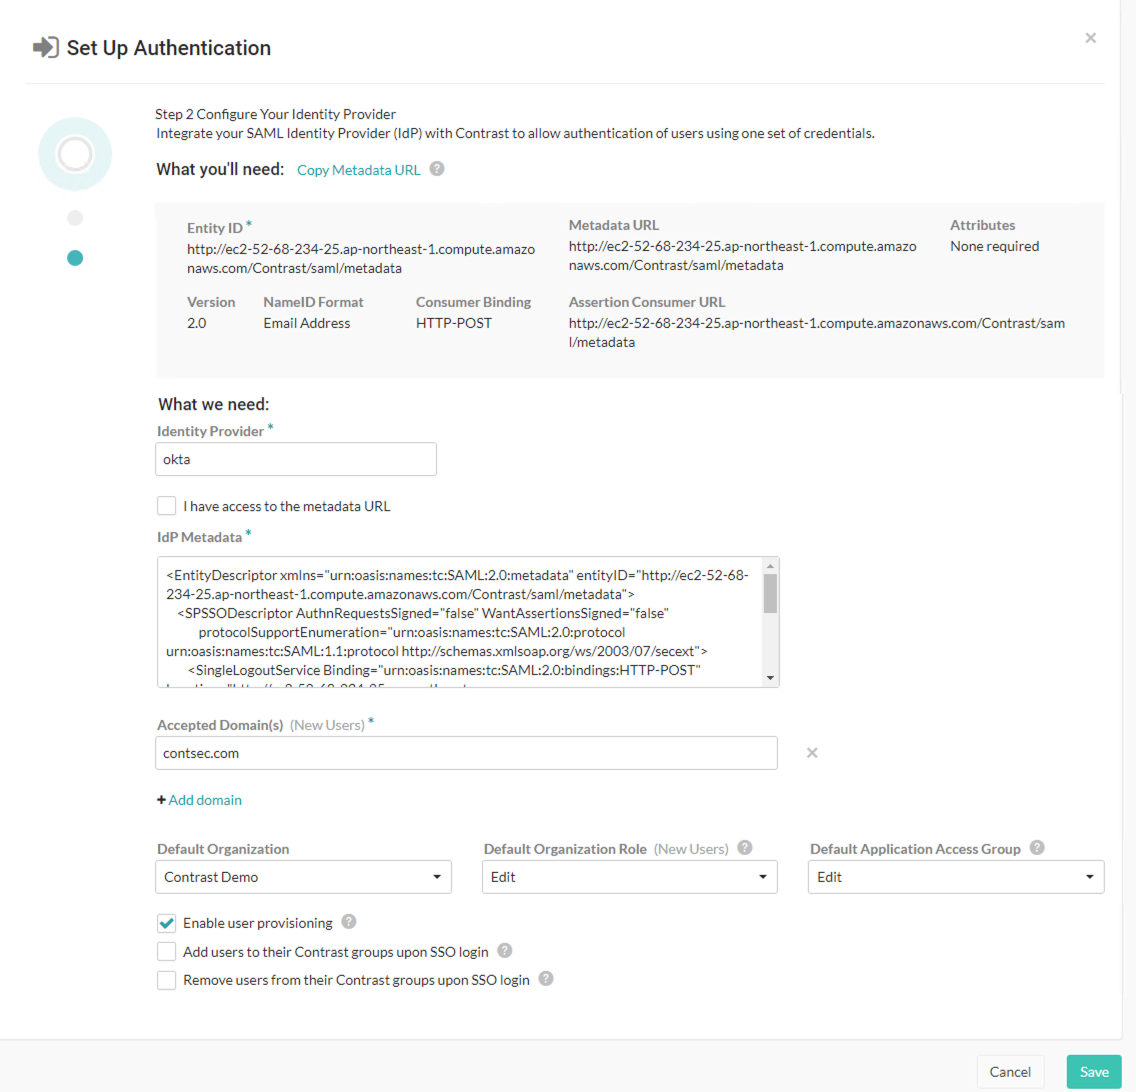
In the Contrast, under system authentication, select Authentication, then Change authentication method.
Select Single sign-on.
Use the provided information to set up Contrast with your IDP. (You must also provide the Entity ID and Metadata URL in your IDP configuration.)

Provide a name for your Identity provider.
Enter your IDP metatdata. Select the box if you have access to the metatdata URL, then enter the URL.
If you want to automatically create new user accounts when someone make a SAML request to log in to Contrast, check the box next to Enable user provisioning.
Use the dropdowns to choose the Default organization role and Default application access group for the new users.
Add the Accepted domains that must be used to trigger user provisioning (for example, yourdomain.com).
Note
You can also automatically add users to groups.
Select Save. If an error occurs, you can check debug logs for troubleshooting.
Restart Contrast to apply the changes.
Once connected, you can return to the SSO tab to view and edit your settings. (You must retest and restart Contrast to apply the changes.) To return the organization back to the default configuration, select Revert to Contrast-managed authentication and confirm the change.
If SuperAdmin was disabled during installation, you're provided with two sets of metadata: one for the public node and one for the secret node. You need to set up the configuration for both in the Contrast interface.
See also
 How to troubleshoot problematic SAML integrations